
It often happened to me a few years ago, when I bought new shoes, the shoes were the right size for my feet, but I felt very tight after wearing them with socks which was causing blisters on my ankles and toes.
After researching on the internet, I see that almost all people have this same problem after buying new shoes.
For that reason i started finding for ways to get rid of the tight shoe problem. It took a long time but i succeeded. Now even if i buy a shoe as the same size of my feet, I can wear it comfortably with socks.
Do want to know the 7 tips?
Here I’ve shared those tips to loosen tight shoes. Those who apply these methods will never gonna face the problem of tight shoes.
Believe me, after reading this, you can easily increase the size of tight shoes from home.
So, let’s get started
7 Best Ideas To Loosen Up Your Tight Shoes
1. Walk for a while wearing the tight shoes:

I know you are thinking “what’s so surprising in it” but it’s the easiest and most natural way to loosen new tight shoes. Although it looks like a normal exercise but note that it’s a very important to walk wearing your brand new shoes for 10 to 15 minuite everyday after you break in them.
Apply this trick for at least one hour every day, you will see the benefits within 1 week.
(Quick Note: This method is totaly organic so it will work on any type of shoe but only use this technique if your shoe feels a bit tight. Wearing the shoe with a cotton sock will be very good for your feet, it will protect your feet from tight shoes.)
2. Loosen the shoes with ice:

Another easy way to stretch shoes is to fill them with water and put them in the deep freezer. Ice help your tight heel, sneakers, dress shoes to be few inches wide.
This does not mean that you have to pour all the water into the shoes, but rather fill a zipped plastic bag (or use a normal plastic bag) with water, and then put them in the shoes.
When water turns to ice it expands in shape. So when the ice expands, the size of the shoe will also gradually increase. After completing the procees you’ll get a comfortable loose shoe.
Required Items:
- 2 strong zip close plastic bags
- Water
Process:
- Before inserting plastic bags into the shoes, fill them with water to check whether there any leakage. Plastic bags should be strong enough to withstand the growing size of ice and not burst. Instead of filling the bag completely with water, fill it partially with water.
- Now place the partially full bug inside the shoe and let all the water fill the shoe size. Make sure the bag is tightly sealed to prevent any water from getting inside the shoe, as this can damage your insoles.
- Leave them in the deep freezer for about 12 to 24 hours. After removing from the deep freezer, leave the ice in a warm place for a while to turn into water. When the ice melts, slowly remove the plastic bags.
(Quick Note: You can try it on any type of shoe except leather shoes, it can work better for open-toe, pick-toe or athletic style.
If you do not have a stiff plastic bag, you can use two plastic bags instead of one. Leaving one inside the other.
If you put shoes directly inside the fridge, your mother or wife may get angry and kick you out of the house, Therefore, to avoid it, you put it inside a large plastic bag or in a tray and then place it in the fridge.
If it takes a long time for the ice to melt and if you are in a hurry, melt the ice with a hair dryer or break the ice and take it out of your shoes.)
3. Use a shoe streacher:
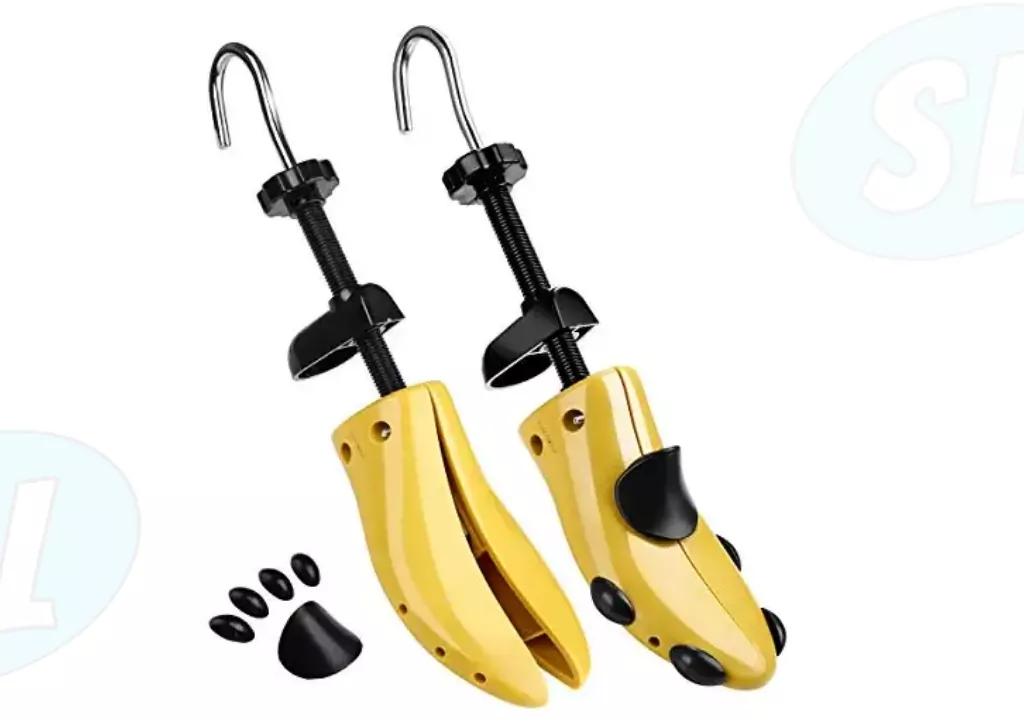
There is a tool available in the market which is specially designed to stretch shoes which looks like a shoe tree, It is Shoe Streacher. It has a few designed plugs that allow you to stretch out any part of the shoe.
This allows you to increase the size of a shoe from the both side. A shoe streacher not only hold the original shape of shoes but also help to loosen up shoes.
The shoe streacher also has a adjustable lever, through which you can increase its length and width of a shoe. This tool works great on Leather shoes, loafer, Dress shoes.
Process:
- Simply, Insert a Shoe Streacher inside a shoe, and rotate its lever to fit it tightly to your needs.
- Now leave the shoe streacher in for about 8 to 12 hours and if your shoes are still too snug then repeat the same process until you get the desired size of the shoes.
You can use a double side adjustable shoe tree to loosen shoes. If you interested in this topic then check out Best Adjustable (Plastic + Wooden) Shoe Trees In India
4. Use wet papers

This trick works great on Canvas shoes. You may noticed when wet newspapers dry, they will get bigger and stiffer, which will make your shoes loosen more easily.
Process:
- First remove the sole from the shoe. ( if it is removable)
- Then soak some newspapers in water and make a round shape put it inside the shoe. In this way cover the entire area inside the shoe as tightly as possible with the balls of wet newspapers.
- Once inner area of the shoes is full, leave them at room temperature until they completely dry.
- Take them out of your shoes.
Quick Note: Please avoid using this technique on leather shoes.
5. Heat Your shoes:
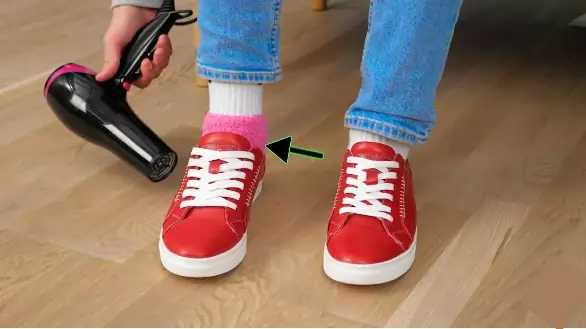
This is the fastest way to loosen tight shoes. This trick is a little risky but it will be worth it. If you are in a hurry, this is what can help you. Basically, the heat makes the shoe material softer which allows to form your foot-like shape.
Required items:
- Fluffy socks
- Hair dryer
Process:
- Put on fluffy/thick cotton socks on a normal sock, then slip your feet into your shoes.
- Set your hair dryer to medium heat and blast each shoe for about 30 seconds to the tight areas. Move the nozzle around at a distance of 20 cm.
If you still don’t get the size shoe shoe you want even after the first heat, then reheat it after the shoe cools down completely.
(Ouick Note: The heat can soften the glue used in some shoes, causing the upper part of the shoe to separate from the sole. So never leave the tip of the hair dryer in one place for long.
Never try this on plastic or PVC shoes – they will not stretch but you can release toxic fumes into the air.
To protect the leather, apply a leather conditioner or moisturizer to the shoes before using this method.)
6. Take the help of microwave
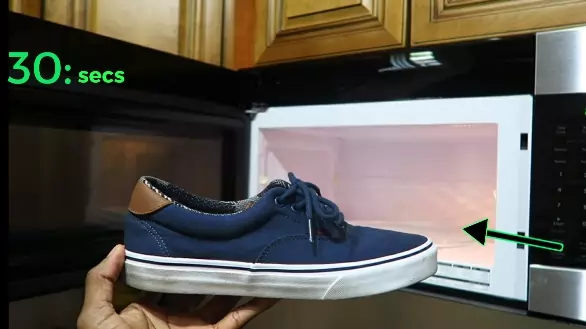
If you get new pairs of canvas shoes and unfortunately they are a little bit stiff. You can use a microwave to loosen your shoes.
As I said in the 5 no. method, the heat makes the shoe material softer. It will turn your tight shoes into comfortable shoes.
Process:
- At first put a paper inside the micreowave where you will put your shoes.
- Insert the shoes in the microwave for no longer than 30 minutes.
- Then take the shoes out of the microwave and put them on while they are still hot. Walk and jog for 1 minute by wearing them.
- After 1 minute, they start to cool down, open them and put them back in the microwave for 20 seconds. Wear them again after 10 seconds and walk and jog for a while.
Quick Note: Before using this method make sure there are no metal pieces on the shoes. And don’t keep your shoes in the microwave for more than 30 seconds.
7. Contact with the professionals:
Don’t be discouraged if the tips mentioned above don’t work for you, you still have one option left.
Most professional shoe repair shops or skilled cobblers provide shoe loosening services. They have some special tools that can easily increase the size of a shoe without changing its shape.
The Bottom Line:
This is the complete in-depth post about ” How to streach any type of shoes “.
In this post I’ve shared a total of 7 strategies that will help you to do it, personally i love to use number 3 and 5 methods.
Which part of this article do you like most? And if you have other ideas to loosen up shoes let me know in the comment section!
Now it’s your turn to tell others about the 7 strategies to streach out any type of shoes.
Hope you enjoyed this short article.
If you found this post informational please share it with your family and friends. I am sure they will appreciate it.
Tada! See you in the next blog!